

Aug 11, 2010
LA Glass - 2000 Pennies Giveaway!!
In celebration of reaching 2,000 fans on her fan page, LA Glass is having a wonderful give away! I must tell you, I have purchased from Lidia and her work is stunning! She uses a vast variety of glass not only in color but in texture and aesthetic which add to her beautiful designs. Her Etsy shop has a great selection of unique stained glass earrings, business card holders, sun catchers and more. She is also on Artifre. Stop by her blog and find out how you can enter her giveaway, trust me, you will be thrilled if you win!!

Aug 5, 2010
Healthy Chicken Pizza

Ingredients:
1 Chicken cutlet seasoned as you desire
1 Whole wheat tortilla
1/2 Cup shredded low fat mozzerella
2 tbsp. olive oil
1 tsp. Italian seasoning
Dash of red pepper flakes
1/2 Vine ripe tomato, diced into large chunks
Directions:
1. Season and cook the chicken cutlet on medium high heat in a tbsp. of olive oil. Once cooked remove from heat and cool for 2 minutes.
2. Cut chicken into strips 1/4 think and 2" long.
3. Sprinkle the cheese on the whole wheat tortilla, drizzle the remaining tbsp. olive oil, sprinkle the seasoning and red pepper flakes and place the chicken strips on top.
4. Heat oven to 350 degrees and place the pizza in the oven for approximately 10-15 minutes. Once the cheese is melted, I set the oven to broil just to brown the cheese. You can do this if you also like your cheese a little burned.
4. Once pulled out of the oven, place the diced tomato on the pizza. This keeps the tomato fresh and adds a coolness to the warmth of the pizza.
5. Slice and enjoy!

Jul 21, 2010
Tree Jewelry Display Tutorial
I have been busy working on custom orders and getting prepared for upcoming markets that I haven't made time to blog at all! I hate slacking! Well enough of my self pitty ;) Here is a quick tutorial on a simple tree display that is really fun to make. You can let your imagination run with you on this display.
Materials:
About 15 ft. 14 gauge, silver aluminum craft wire (or whatever color you prefer)
Upholstery staples
A 10"x8" piece of pine or scrap block of wood
Matte finish spray paint (I used back because of the contrast with silver)
A pencil
Wire cutters
1. Spray paint your block of wood so that it may dry while you are creating. You don't even have to spray paint it if you prefer to have the natural wood shine through.
2. Start by cutting equal length sections of the 15 ft. wire. I cut my sections at about a yard each. Take these pieces, hold them tightly together about 6 inches above one end because the excess will act as "roots" for the base. Begin to twist the wires together so that you are forming a vine like wrap. Wrap the wire up about 10". This will be the tree trunk.

3. For the roots, form little paddle feet at the tips by using a little wire wrapping.
4. For the branches, have fun! I curled, twisted, coil wrapped some sections around a pencil and finished each branch with a little loop. Keep in mind that you may want to hang earrings from the branches so some loops close together would work great!


5. Now that your roots an branches are figured out, shape the trunk as you desire.
6. Now take the dried piece of wood and place the roots accordingly so that the tree won't tilt to one side more than the other, etc.
7. Take your upholstery staples and with a hammer, tap them slightly to start so they set in then bang away!


Done and done!


I loved making this tree. I am a nature lover and wire wrapping is my joy. I got to let go and didn't have to think about nicking the wire! Again, you can totally change this tree up so many ways! Be creative and have fun!
Jun 29, 2010
Necklace and Earring Display tutorial
I will be doing my first craft/vendors market on Saturday and I am working with a budget. I generally like to do things myself if I know the design process is simple and can be completed with minimal investment. One of the things I am making is a necklace and earring display from foam board. I am also making a bracelet display and small earring displays. This tutorial is a simple step by step on how to make the necklace/earring display with a few materials and depending on what you already have, only $10.00.
Materials:
11x17 office paper (or a large piece of newspaper)
20x30 foam board (black or white) 1/4" thick
Heavy duty double sided mounting tape
Pencil
Scissors
X-acto knife
Ruler
Hole punch
Metal jump rings
1. Fold the office paper (or newspaper) in half, draw and cut out your pattern. The design needs to be similar to the one below but you must scale it to the size you prefer. The top (neck) width of my pattern is 7" (and tapers down) the length of the neck is 6". The length of the front base is 1", the base itself is 2" inches tall by 4" inches across/wide. The back support is 6" long and the top flap which is what holds everything together is 4" across.

2. Place the pattern on the edge of the poster board and trace around it. I was able to make 5 displays by placing them as close as possible to each other.

3. Once traced, begin to cut into the poster board along the outline but don't worry about cutting completely through. You may want to work on a workshop table or something you aren't worried about damaging. Once cut, hold the poster board up and proceed to slice through it. It will be easier then trying to cut completely through the first time.


4. Measure 1" in from both edges and mark with pencil. This will be the notch for the necklace. Measure 2" in from the necklace notches and mark with pencil. This will be for the earring holes.

5. Using your ruler, place it along the area that needs to be folded and fold. This helps because the thickness of the poster board is difficult to man handle without a guide. Keep in mind the top flap needs to be folded in the opposite (outward) direction from the base folds.


6. Manually hold the display together and determine where the flap needs to be taped then trace the edges.

7. Place the double sided tape on the flap then using the traced outlines as a guide, adhere it to the opposite side.

8. Using the X-acto knife, cut out two small notches where you placed the lines in step 4 then using a hole punch, punch two holes where you placed the indicator lines leaving a top edge.

9. Place the metal jump rings in the earring holes.

AND, done!


*Note: You may need to weight the displays down by placing a flat and sqaured heavy piece of metal or pottery on the inside of the base to avoid any tipping or falling from wind.
Jun 16, 2010
A Morning at the Park
I had a wonderful trip to the park yesterday morning! I had to make sure I was up early and ready to go because here in Florida it gets to 90° by 11 am and your begging for a swim in the ocean by noon. So an hour or so drive to the state park, my roomy and friend, our cameras and the explorative spirit and I was ready for some great pics and new memories.

First I had to make my way down to the river and make my way to a rock I noticed from the path so I could show off, lol.

Then we began down the path and I had to enjoy this barefooted. I always think of who might have walked in a place before me, hundreds of years ago, even thousands. To think of how the landscape of earth has changed and how a patch of land that I now walk upon might have been hundreds of miles to the north, south, east, or west before.

As we walked, we noticed the river was clearer than it usually this time of year and there were so many bottom feeders indulging in excessive amounts of algae and plant life on the rocks below. Birds flitting about in the tree tops, lizards and snakes scurrying down and away from the path as we walked by, spider webs ALL OVER the place. Amazing how those suckers weave a single thread of silken web in a matter of minutes to get from one side to the other! Then we got to the suspended bridge. Here I was reminded of something my mother used to tell me. She used to tell me that as you get older, you find that you are more fearful of certain things. When we are little and even as teenagers, we don't think of consequences and the possibility of getting hurt when we climb a tree of jump from one rock landing to another, but when you get older, you gain knowledge and knowledge provides you with wisdom, if you'll allow it, and wisdom gives your foresight. These are necessary and blessed abilities, however they didn't help me climb onto this tree! So, I just stayed put with my feet on the bridge and a little stretching along the branch.

I was happy to climb a more welcoming tree down the path however.

As we finished our hike, I came across such wonderful creations and beautiful pictures.


My favorite of all, as we left the park, the path leading out has a sign that states "Take nothing but memories and leave nothing but footprints." This statement would make our lives easier and more productive if we would heed to it when we consider how we treat this planet. Because it isn't "our" planet, we didn't create it, what right do we have to damage it?
Finally, as we left I noticed this thing floating on the air like a torn piece of paper. It was weightless in flight and I realized it was a large moth. So gorgeous and angelic. It finally landed and stayed as I took this shot, my favorite photo of the day by far!

Jun 14, 2010
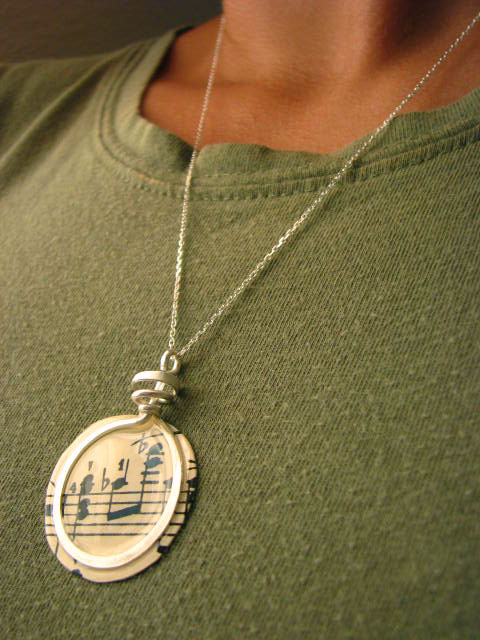
Music "On" My Ears matching necklace
I wanted to share the matching necklace. I'm so happy with this set!


Jun 12, 2010
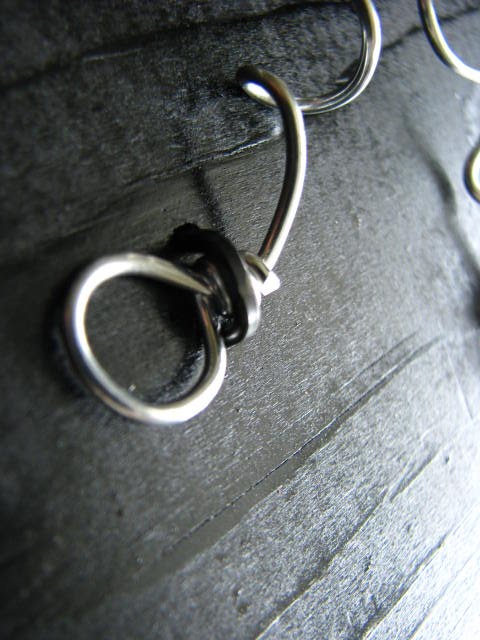
Music "on" my ears - Earring Tutorial
Music is a loved source of inspiration for me next to nature. This is a short tutorial on how to make these unique and lovely earrings for the music lover in your life!

Materials:
Matte finish Mod Podge
Glossy Accents clear, dimensional embellishment or Diamond Glaze
Two nickle sized rounds cut from sheet music
Small, soft bristle paint brush
(2) 5 inch pieces of 16 gauge sterling silver wire
Anvil or jewelry block
Stainless steel jewelry hammer
(2) 16 gauge sterling silver jump rings
(2) sterling silver french ear wires or post ear findings (whatever you prefer)
First, take your rounds of sheet music and coat one side with Mod Podge. Allow to dry, then apply a coat to the other side of each round. Allow to dry.


Take your 5 inch piece of sterling silver 16 gauge wire and form a loop at the top end.

Round the bottom end using a large marker as a guide. Leave a tail which you will wrap softly around the body of the wire. Leave a bit of the tail unwrapped. Now grab your hammer and anvil (or block) and hammer out the rounded portion of the wire and the bit of unwrapped tail. You may need to sand the tail end with a Dremel as burs will likely form from hammering. Using a pair of nylon coated flat nose pliers, shape the hammered remaining piece of wire around the body of the earring wire.
Take the dried sheet music rounds and begin to apply the Glossy Accents or Diamond glaze according to the directions. Avoid air bubbles as much as possible. If air bubbles occur, I use the soft bristle paint brush to smooth them out and it also helps spread the glaze evenly.

Now take the coated sheet music rounds and apply them to the back of the rounded and hammered portion of the wire. Use additional gloss/glaze to coat the sterling silver wire and create a seal between the wire and paper. Smooth out any air bubbles and allow to dry for approximately 60 minutes.

Once dry, insert the jump ring into the top loop and apply the ear wire. Voila!

Belated Recipe Friday: Caesar Vinaigrette

This is a simple salad dressing mixture that I learned from a friend of my mothers when I was a kid. I use this dressing on a bowl of leafy romaine with homemade garlic bread croutons. I make this dressing very "garlicy", if you prefer less garlic please reduce the amount of garlic to your taste as my recipe packs a garlic punch!
Ingredients:
1/4 cup olive oil
1/4 cup aged balsamic vinegar
1 Tbsp. Worcestershire sauce
Zest of half a lemon
5 large cloves freshly minced garlic
1 Tbsp. Anchovy Paste
2 Tbsp. Bleu Cheese
1 Tsp. Salt
Mix all the ingredients with a whisk or fork. The zest of a lemon can be substituted with ready lemon juice. Anchovy paste is used in place of actual anchovy from the can as I have a friend who doesn't care for the bits of anchovy to be visible in the dressing. If you choose to use a can of anchovy, drain the oil and paste the anchovy slightly with a fork.
Jun 10, 2010
Winner!!! "One Year Older - Birthday Giveaway!"

And the winner is.......
Mewes Mountain Arts!
Congratulations and thank you to all the participants who followed, tweeted, hearted and commented during the giveaway! I truly appreciated it!
Jun 4, 2010
Recipe Friday: Spicy Pineapple Chicken

Serves 4
Ingredients:
3 large boneless, skinless chicken breast
1 tsp. olive oil
1 can pineapple tidbits (drain juice from tidbits, reserve juice)
1/2 a large red bell pepper diced
1/4 cup low sodium soy sauce
1 tsp. brown sugar
1 tsp. red pepper flakes
Directions:
1. Heat olive oil in a large skillet. Cook chicken over medium heat.
2. Once fully cooked, add the red bell pepper and saute over medium low for 10 minutes.
3. Add the pineapple juice, soy sauce, brown sugar and pepper flakes and allow to boil over medium heat for 5 minutes.
4. Add the pineapple tidbits and cook on low heat for an additional 2 minutes.
Serve with fried rice or jasmine rice.
Jun 1, 2010
One Year Older - Birthday Giveaway!

Isn't it funny how in each society different ages hold different meaning and landmarks for us. As a teenager turning thirteen is a big deal because in your mind you are no longer a "child". At sixteen you are definitely cooler than you were at the coveted thirteen. At eighteen you have the legal right to do whatever you wish with no need for parental consent or approval. The oh so popular twenty one where alcohol flows forth endlessly and "freedom" is a consolidated word phrase for "it just loosens me up and makes everything easy?" Then it starts to get serious around twenty five. You are either happy with the path you have chosen and are embarking on ever more present responsibilities and goals with the tools and wisdom you have gained, or you are slightly freaking out because you still have no direction and you wonder if you are the only one stuck in time with no defined rhyme or reason as to why you are doing whatever it is you are doing. Yeah, the later would be me, and here is where I insert the customary "LOL." But, at twenty five I was NOT "laughing out loud", more like SOL, and I no I don't mean "*!&# out of luck"! More like "sobbing out loud." I look at that moment now and I laugh. My parents and wiser friends consoled me and made me realize that while society provides us with predetermined lines of what success and accomplishment are, only I can measure what my success is.
Now I can't comment on thirty (steadily approaching) or forty, fifty or sixty. But I look forward to reaching those "landmarks" with ease and the unwavering confidence that no matter what happens, as long as I have faith, patience, love and understanding, they will be greater than the landmark that came before!
So, after your patience during that rambling, I would like to reward you with a giveaway. From today until June 9th at midnight I am holding a Birthday Giveaway! For this giveaway the winner will receive a pair of my Hammered Hearts SS earrings and, AND, a $10.00 gift certificate to be used in my shop Shaped By Hand!
To enter:


Mandatory entry:
Visit Shaped By Hand on Etsy and leave a comment here telling me your favorite item. Please include your email address in your comment so that I can contact you if you win!
Additional entries (please leave a separate comment for each). Current followers are eligible!
1 entry: Follow my blog publicly and leave a comment here letting me know.
1 entry: Become a fan of Shaped By Hand on Facebook and leave a comment here with your Facebook name.
1 entry: Blog about this giveaway and leave a link here.
1 entry: Tweet about this giveaway and leave a link here. You can tweet once per day and each tweet will count as another entry. Feel free to use this tweet or something similar:
RT @shapedbyhand Win earrings & a $10 GC! #giveaway ends 6/9/10 #jewelry #etsy http://shapedbyhand.blogspot.com/
5 entries: Purchase an item from my shop and leave 5 comments here. Please include your Etsy user name.
The Giveaway will end midnight on June 9th. The winner will be chosen on June 10th using random.org and his/her name will be posted here and on my Facebook page at 5pm EST. The winner will have 48 hours from the time I post his/her name to claim their prize. If the winner does not claim their prize and attempts to contact them are not responded to, a new winner will be drawn on the 49th hour.
Shipping will not be charged for the individual who wins this Giveaway!
Please, make sure each of your entries has a separate comment!
Thank you again and good luck!!!!
Subscribe to:
Posts (Atom)